 Enjoying fresh food from a healthy source is one of the most enjoyable, and important, aspects of living off the grid. Unfortunately, not every food is in season throughout the year. Of course, there are a variety of solutions for this. Canned foods provide great opportunities, but oftentimes, commercial preparations are filled with too many preservatives to be considered fresh. In addition, certain foods do not lend themselves to being canned easily. However, food dehydration is a way you can enjoy your produce in a variety of ways, while knowing the food you are eating has come from a trusted source and is free of preservatives.
What is a Solar Dehydrator?
Food dehydration is not a new concept. From raisins to prunes to jerky, food has been dried for storage and later consumption for years. Solar dehydration simply refers to using the sun’s energy to complete that process. If built correctly, a solar dehydrator will not need any electricity and will be able to dry foods in even the most humid climates.
Types of Solar Dehydrators
There are literally hundreds of varieties of solar dehydrators. Deciding which one to build will really be a matter of taste and necessity for your family. There are several important elements in selecting a design:
- It must dry food fairly quickly in your environment.
- It is easy to use, particularly in terms of loading, unloading, and cleaning.
- It is easy to maneuver, set up, and put away.
- Portability is relatively easy.
- Durability and sturdiness are also extremely important.
- Venting controls are available to control temperature and airflow.
- The design should be fairly weather resistant.
- The design should be pest proof.
In this instance, we will focus on a design created by the Appalachian State University’s Appropriate Technology Program. This is not necessarily a reflection of preference; however, the design meets our need of using no electricity, drying in any climate, and ease of construction. This design uses a creative system to control airflow, which allows air to move with the use of electric fans. The original design article can be found here. Additional schematics can be found posted in a PDF posted by Doug Sharkey, of the Organic Growers School.
Learn How To Can And Dehydrate Your Own Food…
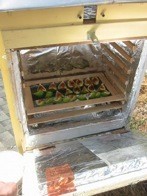
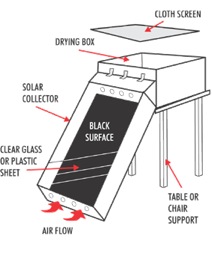
Although you can vary your dehydrator as you build it, the basic design is made of plywood and is built in two components: a heat collector and the dehydrator box. The heat collector is built with a clear plastic top that heats up and pushes air into the dehydrator box above it. You can control the amount of air pushed into the dehydrator box with vents at the bottom. The food is stored on screen trays in the dehydrator box with the hot air from the heat collection box constantly moving around the food. In this type of dehydrator, food such as tomatoes can take approximately two days to complete drying.
Additional information and styles of dehydrators can be found at the Build it Solar website.
What Are the Drawbacks to a Solar Dehydrator?
While eating and working with dehydrated foods provides many benefits, there are a few possible drawbacks that must be understood. Dehydrated food weighs less, which can make it easier to store; however, food preparation times need to be increased. Additionally, food that is dehydrated will have a different taste than its fresh counterpart. This may take some getting used to by family members. Finally, solar dehydrators are limited to use only when the sun is out, which will require planning.
Build the Heat Collector Box First
- The box should lined with a black plastic sheet or painted black; however, petroleum based paints should not be used as the fumes will affect your food.
- Holes should be made at the bottom front of the collector to allow for air ventilation (filters should be placed on the inside to keep out pests and other debris).
- The bottom and sides can be covered with Styrofoam or others types of insulation to increase heat efficiency.
(The image to the right shows an excellent example of a heat collector with a smaller, roofless version of the food dehydrator.)
Build Dehydrator Box Second
- Construct a box out of plywood with vents at the bottom front to receive the heated air from the heat collector.
- Line the dehydrator box with aluminum foil or other reflective material.
- Ensure trays are at least five inches shorter than the container so air can circulate completely around the food trays.
- Each individual tray should be made of plywood pieces and food-safe screens.
Several videos can be found that provide overviews of how to build a good food dehydrator.
The first video offers an excellent visual of a shorted heat collector and smaller dehydrator box.
The second video was created by a group of engineering students at the University of Wisconsin – Madison.
The final video is a description of a similar dehydrator and heat collector that can be built.
© Off the Grid News


