One of the things that most preppers are concerned about is producing their own electrical energy. Let’s face it: we’re a society that is hooked on electricity. Almost everything we do requires some sort of electronic device. We can’t even talk to one another anymore, but instead use chat and text messages.
Even without the superfluous things like our televisions and video games, there are a lot of useful things that use electricity. While I’m sure it would be possible to survive without it (after all, people did so for thousands of years), I’m also sure that surviving the aftermath of whatever disaster will be easier if we can use some of our electronic toys to cook, communicate, and keep our food cold.
It’s a commonly known fact that the electric grid is the most sensitive part of our infrastructure. Every storm that comes along knocks down power lines. If the storm is serious enough, it can take weeks to get it all back up and operating. With a nationwide disaster, it might easily take several months to get electrical power back to everyone, everywhere.
With that in mind, there’s good reason for preppers to have their own source of producing electricity. This generally takes one of three forms (or a combination thereof):
- Generators
- Solar power
- Wind power
While generators are great for the short-term, the amount of fuel they require makes them totally impractical for the long term. On the other hand, both solar and wind power are great long-term solutions. A mix of the two allows you to have power even when the weather isn’t being cooperative.
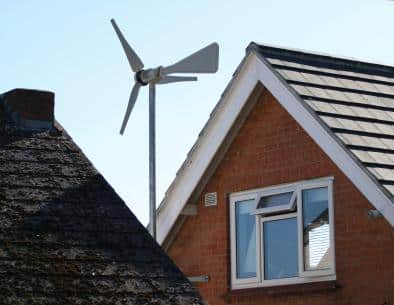
Taking all this into account, I decided to build myself a wind generator. I see that a number of other preppers have done this, but I’ve always been leery of building a horizontal wind generator (turns around a horizontal axis), as they have a reputation for being noisy. On the other hand, vertical wind generators (turns around a vertical axis) are extremely quiet, so I decided to give that a try, even though it’s much more complicated to build.
Brand New Way To Generate Your Own Perfect Power…
The best model I had for a vertical wind generator was one of those tall, thin vertical fans. If you’ve ever used one, you know how quiet they are. That’s what I was looking for: a wind generator that was quiet, so that it wouldn’t bother my neighbors. The other advantage of this style wind generator is that it doesn’t need a tail to point it into the wind; it’s always pointing into the wind, no matter what direction the wind comes from.
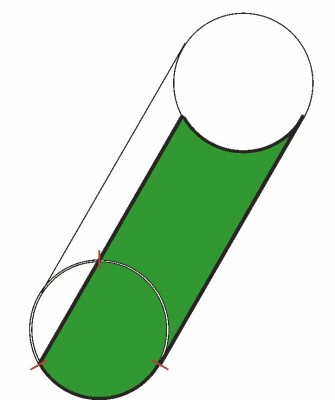
The hardest part of coming up with this design was figuring out a way to make the curved blades. This was easily, if not all that cheaply, solved by buying eight-inch PVC pipe. If I were to do it again, I’d probably save myself a bundle of money by using six-inch pipe. To turn the pipe into blades, I first cut the pipe in half lengthwise and then cut it in thirds down the length of the pipe. So, each of my blades is a curve that’s about eight inches wide by almost ten feet long.
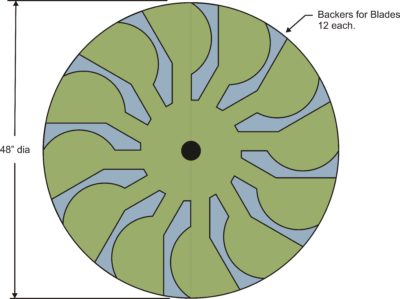
These have to be mounted to a top and bottom plate to hold them in position. I designed my top and bottom plates to hold the blades at exactly 90 degrees to the edge of the plate. That way, at some time in each revolution, each blade will be at exactly 90 degrees to the direction of the wind. When they are on the other side of the revolution, the curved back of the blades is to the wind, reducing drag.
My top and bottom plate are made out of 3/4” plywood, with the blocks to hold the blades in place cut out of poplar. I wanted the harder wood to help prevent the blocks from becoming damaged by strong winds.

My plate diameter was limited to 48 inches by the material that I chose to use for the plate. If I were to do it again, I’d use a larger plate diameter, even though it would mean laminating different layers of plywood together. The larger the diameter, the more leverage, allowing a milder wind to turn the wind generator.
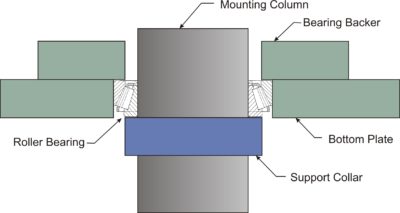
The next problem I had to face was mounting the wind generator. This was done on a two-inch diameter pole. I have the bottom of it seven feet off the ground, to make it higher than the back fence of my property, which is six and a half feet high. For the bottom plate, I installed a tapered roller bearing between the plate and the pole, to ensure minimum friction. For the top plate I used a simple sleeve bearing. The weight of the wind generator is carried by the bottom bearing, while the top is only there to provide balance.

Be sure to grease the roller bearing unless you use one that is pre-lubricated. The support collar is designed to be held in place by a setscrew, but I didn’t trust that alone. So, I welded it in place once I had found the right location. A second support collar is on the top of the unit, preventing the wind from lifting it in any way.
There’s also a pulley mounted to the bottom plate, which isn’t shown in that drawing. I couldn’t get a pulley with a center hole wide enough to go around the two-inch tube that I used as a support column, so I had to cut the center out of a pulley and then mount it to the bottom side of the bottom plate. That’s not unlike what they do with some pulleys in automotive applications (for alternators and air conditioning compressors). The real trick is to make sure that it is centered exactly, as compared to the bearing.
I used an eight-inch diameter pulley for the wind generator and a four-inch one for the motor that I used as a generator. This doubled the effective speed of the wind generator, increasing the electrical output.
My original plan was to use an alternator out of a car for generating electricity. The problem with that was that automotive alternators require a pretty high RPM in order to produce power. I didn’t feel that my wind generator was going to be running at over 1,000 RPM, the minimum speed that it would need for that automotive generator. So, I found a used DC motor on eBay and bought it.
For my motor/generator, I selected a relatively low-speed motor with a higher voltage than I needed. The one I ended up with is a 28-volt motor that runs at 42 RPM. That was intentional, so that when it is running at a lower speed, it will still produce more than 12 volts. Had I chosen a 12-volt motor, it would only produce enough electricity to charge my batteries when it was running at full speed.
The electrical part of my system is fairly straightforward, the same as what everyone else does. However, I put the electrical system in a garden shed that was by the wind generator. The reason for this is that wire size is determined by the amount of amperage is running through the wires. By putting everything close to the generator, I only needed to run large-gauge wires a short distance. The wires running from the voltage inverter to my house are a much smaller gauge, which saved me money.

The leads from the motor go directly to a battery charger, which is charging my bank of batteries. I had to find a 12-volt charger that took a 12-volt input, which is a bit tricky, but they do exist. For the batteries, I currently have four deep-cycle marine batteries. I hope to increase that in the future so that I have more reserve capacity. The output of the batteries runs through a voltage inverter, which bumps it up to 120 volts AC, so that it will power things in my house.


